Written by Thomas Harlan, Jim McGrath; Reporting Services Team - iatricSystems

If you’ve started using Microsoft’s SQL Server Integration Services (SSIS) toolkit to create, schedule, and deliver extracts (machine-readable files) to vendors, non-MEDITECH applications, and even internal users who love their Excel, then you know that the same kinds of requirements come up over and over again…
Which means you can speed your SSIS development, and make it more flexible and easier to maintain, by creating an extract template to use each time you start a new project.
Click below for an ExtractTemplate SSIS 2008 project which contains a single .DTSX package:
Note! The example package is in SSIS 2008 because you can forward-convert it to SSIS 2012 or 2014 by loading it into SQL Data Tools in either version. But you can’t go backwards without fiddling with the XML inside the .DTSX package, which is possible in some cases (2014 > 2012) and not in others (2012 or 2014 > 2008)

The structure of this SSIS template might not be what you are used to, if you’ve dabbled with SSIS. The starting Control Flow itself is pretty bare, containing only a Sequence Container and then a Send Email task.
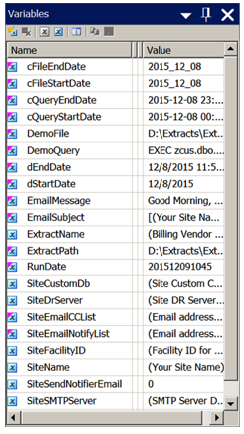
The Variable pane, however (View > Other Windows > Variables if you cannot see it), is where all the action is happening, at least initially:

Using Variables as a Control Panel
Microsoft allows us to control almost every aspect of our DTSX package and its behavior via Properties that can be populated by Variables which can be calculated by an Expression. This lets us define a common set of control variables that are global to the entire package, which we can set centrally, and then change the behavior of the package in helpful ways.
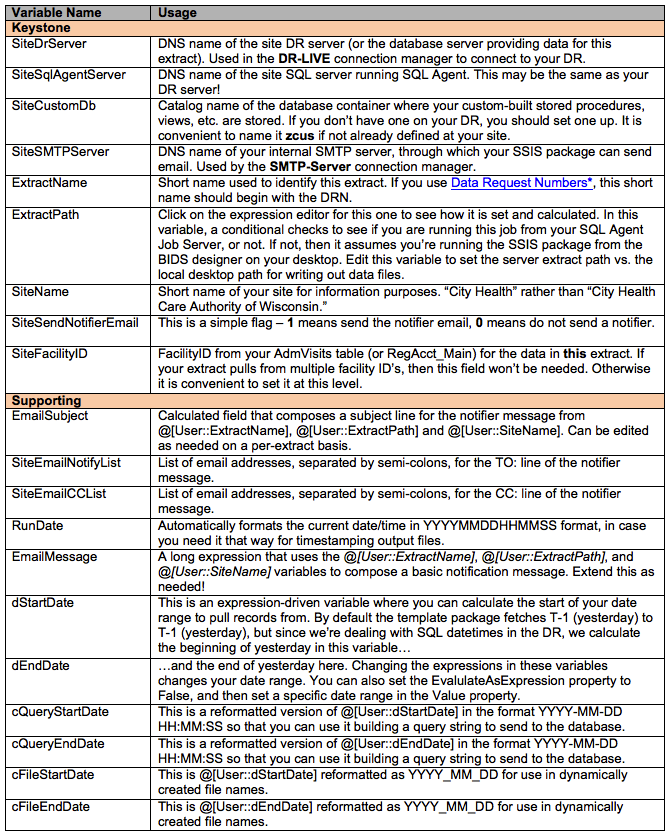
In the template package, a number of preset variables exists, grouped into two categories: Keystone variables which you set specifically (defining foundational values), and then Supporting variables which are then based on calculated expressions using the keystone variables.
 *Click here to view the SQL Tip — The Data Request Number
Per-Extract Control Variables
Once you’ve configured the Keystone variables to match your own DR server, etc., then you want to add at least two (or three) variables per file that you're going to create. These take a standard pattern:

And optionally:

As an example, if you were producing a demographics file for a billing vendor, you would create three variables called:

Naming them this way groups them together in the Variables pane, and lets us centrally control the query that generates the data, and the file name to which the data will be written.
<File>Rows lets us capture how much data we generated in a given file run, and it is useful to include this in the email message.
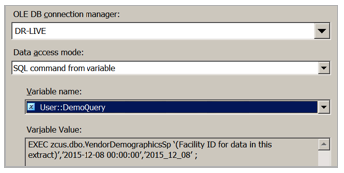
<File>Query contains the code to execute a stored procedure from your DR custom container to get the data you need. For maintenance purposes (and also because it makes SSIS happier), every query should be a stored procedure call, which will look like this (in most cases):

But we build that query string dynamically, in an expression attached to the DemoQuery variable. That expression would look like this:

A critical point (for avoiding problems in SSIS) is to code that stored procedure to produce exactly the columns of data that the extract file needs, in the order they are in the file, and with the data types and formats needed by the file specification.
You absolutely do not want to have to manipulate, derive, or reformat the columns of data in the SSIS data-flow. You can, of course, do so — but maintenance is so much easier if all of that activity happens in the stored procedure!
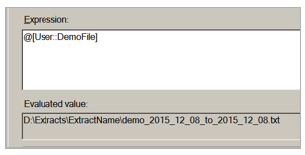
Once <File>Query is set up, we do an equivalent expression for <File>Name to create a file name on the fly:

Which will produce a file name like this:

Note! If you haven’t already created the server and local folder(s) referenced by the ExtractPath variable yet, this is the time to do so.
Each vendor tends to have its own file name formatting rules, so you implement those in <File>Name as needed.
Carry on…
You create the same two (or three) variables per file being generated. When you are done, you may have a slew of variables in the Variable pane, but the next part — where you create Data Flow tasks for each file to create — will be very simple.
The Data Flow Tasks
Add each Data Flow task to the Primary File Set container in the copy of the template .DTSX with which you are working. In the Data Flow task, as you add each OLE/DB Source, you choose “SQL command from variable” for the Data Access Mode field, and then pick the <File>Query variable that you already set up.

Note! We use the OLE/DB Connection Manager by default, and that is how DR-LIVE is set up in the template package. You could use one of the other data drivers as well, if that is your preference.
Remember to rename your tasks as you create them! Please — for our sake, and the sake of generations of programmers to come who will do maintenance — don’t leave them with the default names.
Now, if you’re capturing row-counts, you add a Row Counter step to the task, and connect it to the Query.
The next step is to add a Flat File Destination to the Data Flow task. When you do that (and connect it to the query or Row Counter step), it will prompt you to create a new Connection Manager for the file. That connection manager should have a name matching our general scheme, which also indicates the kind of file it is:
![]()
When you create that Connection manager, it is going to prompt for a file path — one that you have to pick by hand. Do so, but make sure that the file name you enter is something short and non-compliant with the vendor’s scheme. You do this to make sure that the next step happens…
Once the <File>-TXT connection manager is created, click on it in the Connection Managers pane, then go into Properties > Expressions > […] > Property > Connection String, then click on the […] icon beside the Expression field and drag the <File>File variable down into the expression window:

Now the Variable will override the bogus name you put in, and the file name will be dynamically created by the expression…which means it will automatically adjust per day, and will update itself if you change the ExtractPath logic, etc.
Do the same for the rest of the files you have to generate.
As you do this, you’ll see that all of the time you spent prepping the control variables is paid back immediately! Creating the Data Flow tasks this way is quick and easy. Because the stored procedure per file generates exactly the layout needed, no further changes are needed in the SSIS package.
If you forget to update a Flat File connection manager with its matching variable, the first time you run the package to generate test files you will see that one or more of them will have the wrong file names. Get those cleaned up!
Managing the Template
Click here for an ExtractTemplate solution with associated project file and the template .dtsx itself. Store this to your group \SSIS area (you have one of those, right?) in its own folder.
Then when you need to start a new project, do so. Remove the Package.dtsx that gets created automatically. Then right-click the SSIS Packages node in the project, choose Add Existing Package, and pick the template .dtsx from the File System.
This automatically makes a copy of the template and adds it to your new project. The original template .dtsx remains where it was, which is convenient in this workflow. Rename the new package to something appropriate (remembering to embed the DRN number in the package name, if you’re using Data Request Numbers).
If you identify changes needed to the template, you have one place to make them…but unfortunately those changes do not magically propagate to all of the copies that you’ve made. Those must be adjusted by hand, as needed. 8-(
Extra Credit
If you don’t use this SSIS add-on yet, download and install it now: BIDS Helper. Super useful.
If you need more help…
Our Report Writing team can help you fix reports, create new ones, make old ones faster. Simply reach out to your Iatric Systems Account Executive or our NPR report writing team at reportwriting@iatric.com to discuss how we can help support your team!